Showing posts with label red. Show all posts

Friday, February 28, 2014

February Day 14: Match OOTD

My outfit for February 14 was pretty boring because I just went to the doctor and work that Friday. This manicure matches my outfit for Saturday, February 15th, which was a blue skirt with white pin stripes, a red top, and my black bead necklace.

So, to match my outfit, I used Ciaté Power Dressing, Seche Warm Hearted, Essie Licorice and Marshmallow, and Orly Instant Artist Crisp White with Butter London Nail Foundation as the nude color on my index finger.

Thursday, February 20, 2014

February Day 4: Polka Dots

Please pardon the dot smears - that's what I get for doing this in 30 minutes (including top coat). Please pardon the glare - it was cloudy and rainy when I took this photo.

I used Essie Bond With Whomever and Licorice, L'Oréal New Money, Orly Instant Artist Jet Black, and Seche Warm Hearted.

February Day 1: Glitter

I'm participating in a "Nail Art Challenge" for February created by @californails. Day 1 is Glitter so I used Seche Up Close & Personal (the deep red) and Sparkle, Cling, Kiss (the shimmery, foil-like gold with red glitter). 


Wednesday, March 27, 2013

Red Carpet Worthy

For this manicure, I embellished it a little more by adding subtle glitter to the red.

So here's what I did:
Ciaté Dangerous Affair (solid red) and Enchanted Rose (red glitter)
Sonia Kashuk Smoke and Mirrors (applied with a thin paint brush)
Orly Instant Artist Jet Black

By the time I finished, I thought it looked rather elegant and classic. What do you think?


Saturday, March 23, 2013

Loaded Gradient

In a desperate attempt to make up for all the days without having my nails done, I did a gradient, glitter, and rhinestones manicure. I don't usually have so many things going on at the same time, but I do love it!

I used Ciaté Speed Dial, Dangerous Affair, and Cabaret, OPI Pirouette My Whistle, and Cina Rhinestones.

In case the pictures don't really show it well, it goes from orangey-red, to red, to purple.


Thursday, December 20, 2012

Lavalicious

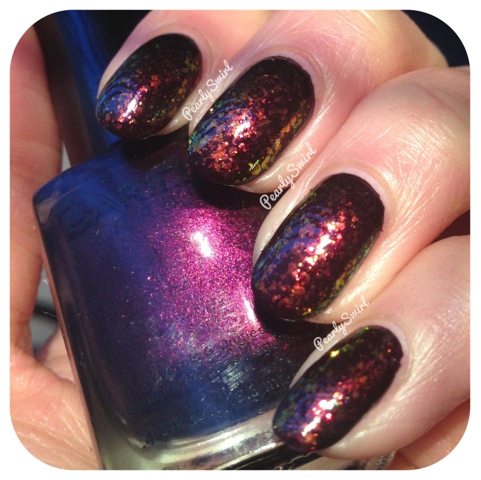
I used Barielle Hidden Hideaway and Essie Shine of the Times. It glows red/orange and occasionally green. I could not stop looking at this! Most of the time the middle of each nail reflects orangey red and the sides reflect green...I think it's because of the curve of my nails.

Everyone should try layering a flakie polish like Shine of the Times over a dark polish just so they can experience this gorgeousness.


Barielle Hidden Hideaway

Barielle Hidden Hideaway is a very dark purple with purple/red shimmer. It looks almost black unless it is in direct sunlight like in this picture. The orange of the sunset made it look a little more red here though.

Thursday, November 29, 2012

Ciaté Mini Mani Month Reds and Pink Review

Yesterday I swatched the Ciaté Mini Mani Month reds and pink. Compared to the blues and purples I have already done, I think that the reds have a better formula and look at those colors, gorgeous! The pink is very nice too, but I'm still blown away by the richness of the reds. All swatches are over Butter London Nail Foundation with no top coat.


Dangerous Affair is a deep berry red, deeper and darker than I was able to capture. I painted two coats here and liked the way it looked, but you still can see my nails a little bit through the polish on my index and middle fingers. I would describe this as a high pigmented jelly.

Enchanted Rose is a bright red glitter in a clear base. This is three coats over base coat. This glitter really glistens and I wish I was able to capture that in my photos. Like the other two glitters in this collection, there is no grittiness whatsoever.

Mistress is a bright red and reminds me of the most iconic shade of red lipstick possible. I'm not sure if that makes any sense, but that's the first that popped into my mind as I painted this. I would say that it is a jelly formula, but it was opaque in two coats. The reason I say it has a jelly formula is because I tried it over Enchanted Rose and could still see the glitters underneath.


Cupcake Queen is a bright/neon pink with an iridescent blue shimmer. It has a very smooth formula that is opaque in two coats. 


Tuesday, September 18, 2012

Louboutin Nails

I used Essence Nude It! for the main color and OPI I'm Not Really a Waitress for these Louboutin inspired nails.

In order to create this look, all you need to do is have a main color that you use to paint the top of your nail (that's what I'm going to call the part that I normally paint) and then use a red polish to paint the underside of your nail tip. You will need to have nails long enough that extend past your fingertip to really have the full effect. Word of caution: I advise using a small nail art brush to apply the red. Even doing that, I got red all over my fingers and cleanup was a pain.

On the plus side, I was finally able to use my only nude polish in my collection, Essence Nude It! I bought it before Essence came out with their new bottle shape an size which was too bad because the brush on the older tiny bottle was so small it took me forever to paint my nails. I love the color though, in fact, I should get more nudes as soon as I can because I think they are so sophisticated and understated. Also, please pardon my bad job of cleaning the polish off my cuticles...that's the result of painting and cleaning up my nails in a dimly lit room.

Saturday, August 11, 2012

OPI I'm Not Really a Waitress

I posted a photo of a very old swatch of I'm Not Really a Waitress before on my blog but decided to replace it with this newer one. As always, I'm Not Really a Waitress never fails on delivering smooth application and vibrant color.

Wednesday, August 8, 2012

Poll Winner - Cherries

The Cherry design was the recent poll winner, and when the time came for me to do the design, I realized I didn't have a true green for the leaves. The color I used is more of a dark sea green.

To start off, I used Essie Blanc and OPI Pink-ing of You for the base.


Then I used OPI I'm Not Really a Waitress and a large dotting tool (really it was the end of a eyeliner makeup brush) to make the cherries, Orly Instant Artist Jet Back for the stems, SinfulColors Rise and Shine for the leaves, and Essie Blanc with a small dotting tool for the polka dots on the thumb and with a small paint brush for the little shine on the cherries.

Thursday, July 26, 2012

Glitter Gradient

I was recently in need of a manicure that was both sophisticated and festive. I decided to go with my favorite red, OPI I'm Not Really a Waitress, as the base. Then, with OPI Pirouette My Whistle and Milani Silver, I created the glitter gradient. This manicure paired very well with my black dress with white polka dots as red is classic and the glitter mimicked the white polka dots.
Sunlight
Indoor Lighing

Friday, July 20, 2012

Minnie and Mickey Mouse Inspired

My sister saw a manicure she wanted me to replicate for our trip to Disneyland and California Adventure today. I really need to practice my freehand drawing. The only difference from the original manicure she showed me is that the ring finger had a white Mickey Mouse glove. I wasn't about to paint white over that dark color in case I messed up, so my sis said it was ok to do dots. They match her cute shirt too. (It's white with black polka dots, a black bib neckline, and a pink strip at the hem.)

I used Nicole by OPI Here Kim's the Sun, OPI Lincoln Park After Dark and I'm Not Really a Waitress, ChinaGlaze Love Marilyn, and Essie Blanc. The thumb is a red tip with a black bow that has a white center.

Wednesday, June 27, 2012

Chevron Manicure

OPI I'm Not Really a Waitress and Lincoln Park After Dark. I used Scotch tape as a guide for the chevron.
1. Two coats of I'm Not Really a Waitress. 2. I applied the corner of a piece of tape at the base of my nail. 3. I painted the nail (over the tape as well) using Lincoln Park After Dark. 4. Immediately but slowly pull off the tape.

Wednesday, June 20, 2012

Cherry Bomb Gradient

Tried out a different technique to do a Gradient Manicure. I painted my base first using OPI Pedal Faster Suzi! Then used OPI I'm Not Really a Waitress for the tips.
Starting from top right. 1: Paint a strip of the pink polish and red polish right next to each other. 2: Using a toothpick or dotting tool, drag the red up to the pink to blend the two colors only where they meet. 3: Press the makeup sponge right on the polish from above. (The sponge will soak up the color.) 4: Then gently apply the sponge to the tip of the nail, working your way up towards the cuticle to gradually add the red color. (You can focus more of the red on the sponge on the tip to of the nail if you need to.) 5: There is the finished Gradient Manicure.
The finished product

Saturday, June 16, 2012

After My Own Heart

I've been wanting to do little hearts for a long time but this was my first and practice manicure. My sister requested this. Base was OPI I'm Not Really a Waitress. The hearts were made with a dotting tool, but I don't remember which white polish.